Archive for category Windows Phone 7
Windows Phone location awareness– routing (part 3 of 3)
Posted by eliasmarkelis in Bing maps, Routing, Windows Phone 7 on February 16, 2012
In this post we will continue to expand the application we wrote in the previous post Windows Phone location awareness– routing (part 2 of 3). Now it is time to use the routing service offered by Bing Maps SOAP Services.
Getting started
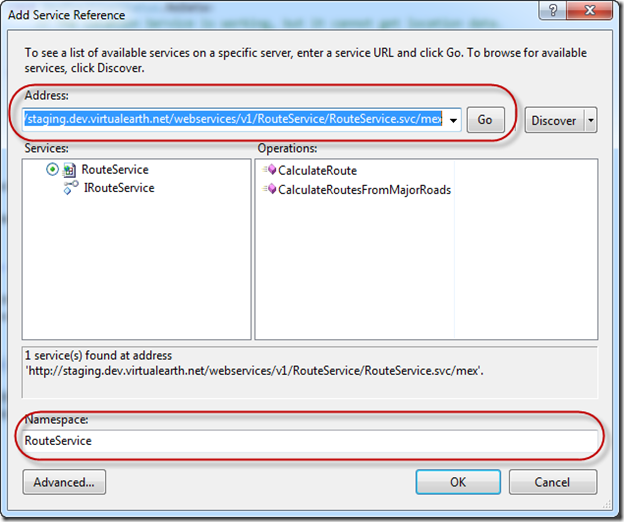
First of all we have to add a service reference to the routing service. From Solution explorer left click your project and click Add Service Reference… In the address textbox write: http://staging.dev.virtualearth.net/webservices/v1/geocodeservice/geocodeservice.svc (remember to use the staging service for applications that are not released yet or are in beta) and click Go. The available services will appear and in namespace write RouteService and click OK.
Let’s add a new class to our project and call it RoutingHelper.cs. There we are going to implement all the needed code for the geocoding.
Routing Helper
In the routing helper class we are going to implement all the necessary code for the routing. Because routing can support multiple waypoints we are going to pass as an argument for the calculation a list of pushpins plus we are going to return directions,a map layer with the route and the bounding rectangle of the route.
public class RoutingHelper
{
private string _applicationId;
private RouteServiceClient _routeService;
public delegate void RouteCalculateEventHandler(MapLayer layer,LocationRect rect,string directions);
public event RouteCalculateEventHandler RouteCalculated;
public RoutingHelper(string applicationId)
{
_applicationId = applicationId;
InitService();
}
private void InitService()
{
// Create the service variable and set the callback method using the CalculateRouteCompleted property.
_routeService = new RouteService.RouteServiceClient("BasicHttpBinding_IRouteService");
_routeService.CalculateRouteCompleted += new EventHandler<RouteService.CalculateRouteCompletedEventArgs>(routeService_CalculateRouteCompleted);
}
public void CalculateRoute(List<Pushpin> wayPoints)
{
// Set the credentials.
RouteService.RouteRequest routeRequest = new RouteService.RouteRequest();
routeRequest.Credentials =new Credentials();
routeRequest.Credentials.ApplicationId = _applicationId;
// Return the route points so the route can be drawn.
routeRequest.Options = new RouteService.RouteOptions();
routeRequest.Options.RoutePathType = RouteService.RoutePathType.Points;
// Set the waypoints of the route to be calculated using the Geocode Service results stored in the geocodeResults variable.
routeRequest.Waypoints = new System.Collections.ObjectModel.ObservableCollection<RouteService.Waypoint>();
//Adding way points
foreach (Pushpin ps in wayPoints)
{
routeRequest.Waypoints.Add(PushpinToWaypoint(ps));
}
// Make the CalculateRoute asnychronous request.
_routeService.CalculateRouteAsync(routeRequest);
}
//Make the waypoints
private RouteService.Waypoint PushpinToWaypoint(Pushpin ps)
{
RouteService.Waypoint waypoint = new RouteService.Waypoint();
waypoint.Description = ps.Content.ToString();
waypoint.Location = new Microsoft.Phone.Controls.Maps.Platform.Location();
waypoint.Location = ps.Location;
return waypoint;
}
// This is the callback method for the CalculateRoute request.
private void routeService_CalculateRouteCompleted(object sender, RouteService.CalculateRouteCompletedEventArgs e)
{
// If the route calculate was a success and contains a route, then draw the route on the map.
if ((e.Result.ResponseSummary.StatusCode == RouteService.ResponseStatusCode.Success) & (e.Result.Result.Legs.Count != 0))
{
// Add a map layer in which to draw the route.
MapLayer myRouteLayer = new MapLayer();
// Set properties of the route line you want to draw.
Color routeColor = Colors.Blue;
SolidColorBrush routeBrush = new SolidColorBrush(routeColor);
MapPolyline routeLine = new MapPolyline();
routeLine.Locations = new LocationCollection();
routeLine.Stroke = routeBrush;
routeLine.Opacity = 0.65;
routeLine.StrokeThickness = 5.0;
// Retrieve the route points that define the shape of the route.
Ellipse point;
foreach (Location p in e.Result.Result.RoutePath.Points)
{
// For each geocode result (which are the waypoints of the route), draw a dot on the map.
point = new Ellipse();
point.Width = 12;
point.Height = 12;
point.Stroke = new SolidColorBrush(Colors.Blue);
point.Fill = new SolidColorBrush(Colors.Red);
point.Opacity = 0.65;
GeoCoordinate location = new GeoCoordinate(p.Latitude, p.Longitude);
MapLayer.SetPosition(point, location);
MapLayer.SetPositionOrigin(point, PositionOrigin.Center);
// Add the drawn point to the route layer.
myRouteLayer.Children.Add(point);
//waypint to the routeline
routeLine.Locations.Add(new GeoCoordinate(p.Latitude, p.Longitude));
}
// Add the route line to the new layer.
myRouteLayer.Children.Add(routeLine);
// Figure the rectangle which encompasses the route. This is used later to set the map view.
// The rectangle must be defined as llx,lly, urx,ury. Since we don't know the exact route shape
// beforehand we need to validate the coordinates first
double minLat = routeLine.Locations[0].Latitude;
double minLon = routeLine.Locations[0].Longitude;
double maxLat = routeLine.Locations[routeLine.Locations.Count - 1].Latitude;
double maxLon = routeLine.Locations[routeLine.Locations.Count - 1].Longitude;
if (minLat > maxLat) // Swap min/max Lat
{
double tmpLat = 0;
tmpLat = minLat;
minLat = maxLat;
maxLat = tmpLat;
}
if (minLon > maxLon) // Swap min/max Lon
{
double tmpLon = 0;
tmpLon = minLon;
minLon = maxLon;
maxLon = tmpLon;
}
// This should always be a valid rectangle (minLat,minLon < maxLat,maxLon)
LocationRect rect = new LocationRect(minLat, minLon, maxLat, maxLon);
// Retrieve route directions from the RouteLeg.Itinerary class.
StringBuilder directions = new StringBuilder();
//Initialize directions counter
int instructionCount = 1;
//Loop through Interary instructions
foreach (var itineraryItem in e.Result.Result.Legs[0].Itinerary)
{
directions.Append(string.Format("{0}. {1} {2}\n",
instructionCount, itineraryItem.Summary.Distance, itineraryItem.Text));
instructionCount++;
}
// The itineraryItem.Text is in XML format e.g.:
//<VirtualEarth:Action>Depart</VirtualEarth:Action>
//<VirtualEarth:RoadName>Aigaiou</VirtualEarth:RoadName>
// toward
// <VirtualEarth:Toward>Cheimonidou</VirtualEarth:Toward>
// In this sample we will remove all tags around keywords.
// You could leave the tags on if you want to format the directions into a databound control
Regex regex = new Regex("<[/a-zA-Z:]*>", RegexOptions.IgnoreCase | RegexOptions.Multiline);
string results = regex.Replace(directions.ToString(), string.Empty);
RouteCalculated(myRouteLayer, rect, results);
}
}
}
Now it is time to utilize the routing.
Final touch
At class level of MainPage add a variable for the RouringHelper
private RoutingHelper routing;
In the code of MainPage add the following code to initialize the RoutingHelper class:
private void InitRouting()
{
if (routing == null)
{
routing = new RoutingHelper(((ApplicationIdCredentialsProvider)MyMap.CredentialsProvider).ApplicationId);
routing.RouteCalculated += new RoutingHelper.RouteCalculateEventHandler(routing_RouteCalculated);
}
}
void routing_RouteCalculated(MapLayer layer, LocationRect rect, string directions)
{
throw new NotImplementedException();
}
To the UI after Where am I button add the following button:
<Button x:Name="btnRouteMe" Content="Route Me"
Click="btnRouteMe_Click" Width="240" />
Navigate to the the event handler btnRouteMe_Click and add the following code
private void btnRouteMe_Click(object sender, RoutedEventArgs e)
{
InitRouting();
List<Pushpin> wayPoints = new List<Pushpin>();
foreach (Pushpin ps in posLayer.Children.OfType<Pushpin>())
{
wayPoints.Add(ps);
}
routing.CalculateRoute(wayPoints);
}
Finally we have to implement the routing_RouteCalculated handler
void routing_RouteCalculated(MapLayer layer, LocationRect rect, string directions)
{
MyMap.Children.Add(layer);
MyMap.SetView(rect);
}
By setting the SetView of the map to the enclosing rectangle of our route we ensure that we will se the whole route on screen.
And that’s a wrap our recipe is ready to use.
Windows Phone location awareness– the basics (part 1 of 3)
Posted by eliasmarkelis in Bing maps, Location, Windows Phone 7 on February 16, 2012
One of the most useful things we have on our devices is the AGPS (Assisted GPS) sensor. In this post we will see how we can utilized it and combine it with Bing maps and services. For the sake of simplicity and brevity I will break this blog post in three parts: the basics , geocoding and routing.
First of all we need to get a Bin maps account to create your own key and also take a look at the Bing Maps Licensing for mobile devices. Finally if you haven’t done it already now is a good time to to get also the development tools for windows phone from here .
Getting started
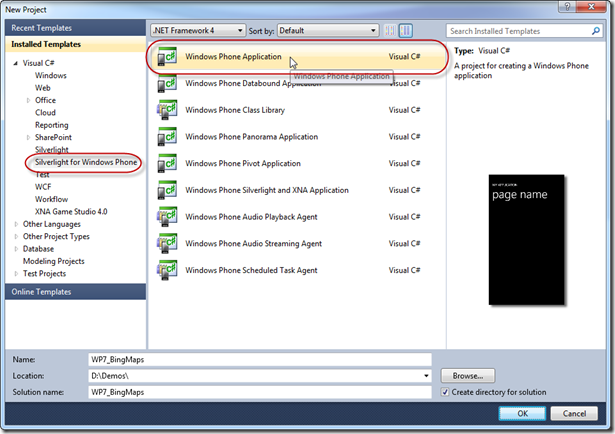
We need to build a new Windows Phone application (do not forget to run VS2010 as an administrator) . Point File->New->Project Windows select the Silverlight for Windows Phone template in the language you prefer and choose Windows Phone Application.
Don’t forget to choose as a target platform Windows Phone OS 7.1
Using the Bing maps control
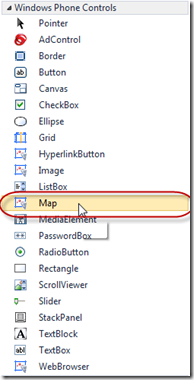
Now it is time to add the Bing maps Control to our app. Pick the control from toolbox and place it on the form
Drag & drop the control to your form from the toolbox
The code for the control should look like that:
<my:Map x:Name="MyMap"
Margin="0,0,0,0" ZoomLevel="18"
ZoomBarVisibility="Visible" Center=" 40.63119,22.94551"
CredentialsProvider="developer's key goes here" />
- ZoomLevel
min zoom level = 1 (word view)
max zoom level =19 (street view) - ZoomBarVisibility
sets whether the map zoom level buttons are displayed - Center
sets the center location of the map view
Let’s talk a little bit more about the map. The map can have map layers as children that mean that we can have as many MapLayer objects as children of the map to make distinct the map thematic layers. In our app we will use 2 map layers. The first one will have our position and the second one the point where we want to go .
Let’s go to the code to implement the first map layer in which we will add also a pushpin to show our current position .
In order to get our current position we need to use the GeoCoordinateWatcher class (namespace: System.Device.Location) which is exposing the Windows Phone location service.
The other stuff we need are the MapLayer class and the Pushpin class from the namespace Microsoft.Phone.Controls.Maps.
In the class scope level we should add the GeoCoordinateWatcher the MapLayer and the Pushpin. Your code should look like that:
public partial class MainPage : PhoneApplicationPage
{
// Constructor
private GeoCoordinateWatcher geoWatcher;
private MapLayer posLayer;
private Pushpin demoPushin;
What we need also is to initialize the GeoCoordinateWatcher in order to get our position and implement the events for PositionChanged and StatusChanged. The initialization code should look like this :
private void InitWatcher()
{
geoWatcher = new GeoCoordinateWatcher(GeoPositionAccuracy.High);
geoWatcher.MovementThreshold = 10;
geoWatcher.StatusChanged +=
new EventHandler<GeoPositionStatusChangedEventArgs>(geoWatcher_StatusChanged);
geoWatcher.PositionChanged +=
new EventHandler<GeoPositionChangedEventArgs<GeoCoordinate>>(geoWatcher_PositionChanged);
new Thread(backgroundLocationService).Start();
}
by setting the MovementThreshold to 10 we are asking to get a new position if we have moved more than 10 meters and we also want the geoWatcher to run in a separate background thread.
, So the rest of the implementation code is this :
void geoWatcher_PositionChanged(object sender, GeoPositionChangedEventArgs<GeoCoordinate> e)
{
demoPushin.Location = e.Position.Location;
demoPushin.Visibility = Visibility.Visible;
MyMap.Center = e.Position.Location;
MyMap.ZoomLevel = 18;
}
Every time the current position changes we are changing the center of our viewable map and the position of the pushpin indicating our position.
Every time the status of our location services changes we want also to inform the user. Add the following TextBlock immediately after the Map control.
<TextBlock Grid.Row="0" x:Name="txbGPSStatus"
VerticalAlignment="Top" HorizontalAlignment="Left"
Foreground="Black" FontWeight="Bold" Text="Receiver status" />
Now we can implement the StatusChanged event.
void geoWatcher_StatusChanged(object sender, GeoPositionStatusChangedEventArgs e){switch (e.Status){case GeoPositionStatus.Disabled:if (geoWatcher.Permission == GeoPositionPermission.Denied){MessageBox.Show("You have disabled Location Service.");}else{MessageBox.Show("Location Service is not functioning on this device.");}break;case GeoPositionStatus.Initializing:txbGPSStatus.Text = "Location Service is retrieving data...";break;case GeoPositionStatus.NoData:txbGPSStatus.Text = "Location data is not available.";break;case GeoPositionStatus.Ready:txbGPSStatus.Text = "Location data is available.";break;}}
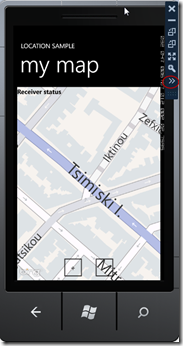
void backgroundLocationService(){geoWatcher.TryStart(true, TimeSpan.FromSeconds(1));}Finally we need to initialize the MapLayer and the Pushpin in the constructor of the pagepublic MainPage(){InitializeComponent();//Initialize posLayerposLayer = new MapLayer();posLayer.Name = "Layer1";MyMap.Children.Add(posLayer);posLayer.Visibility = Visibility.Visible;//Initialize demoPushpindemoPushin = new Pushpin();demoPushin.Name = "Pushpin1";demoPushin.Content = "You are here";posLayer.Children.Add(demoPushin);demoPushin.Visibility = Visibility.Collapsed;InitWatcher();}We are now ready to run our application for the first time
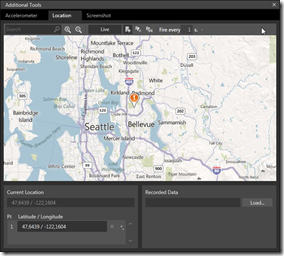
click to show the tool of the emulator and navigate to the location tab
Every time we click on a different position on the emulator map the map centers to our new position.
Windows Phone location awareness– geocoding (part 2 of 3)
Posted by eliasmarkelis in Bing maps, Location services, Windows Phone 7 on February 16, 2012
In this post we will continue to expand the application we wrote in the previous post Windows Phone location awareness– the basics (part 1 of 3). Now it is time to use the geocoding service offered by Bing Maps SOAP Services.
There are two ways to locate a position
- with geocoding by providing the address in order to get the exact point (longitude,latitude)
- with reverse geocoding by providing the point (longitude,latitude) in order to get the address
We will do both in this post
Getting started
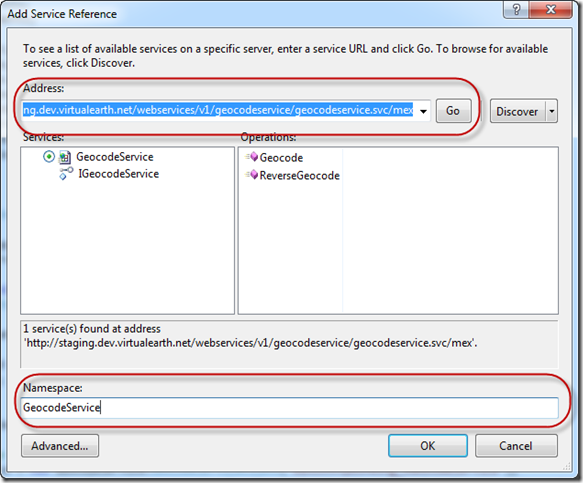
First of all we have to add a service reference to the geocoding service. From Solution explorer left click your project and click Add Service Reference… in the address textbox write: http://staging.dev.virtualearth.net/webservices/v1/geocodeservice/geocodeservice.svc (remember to use the staging service for applications that are not released yet or are in beta) and click Go. The available services will appear and in namespace write GeocodeService and click OK.
Let’s add a new class to our project and call it GeoCoordinateHelper.cs. There we are going to implement all the needed code for the geocoding.
public class GeoCoordinateHelper{private string _applicationId;private GeocodeService.GeocodeServiceClient _geocodeService;public delegate void LocationFoundEventHandler(GeoCoordinate e);public event LocationFoundEventHandler LocationFound;public GeoCoordinateHelper(string applicationId){_applicationId = applicationId;InitService();}private void InitService(){// Create the service variable and set the callback method using the GeocodeCompleted property._geocodeService = new GeocodeService.GeocodeServiceClient("BasicHttpBinding_IGeocodeService");_geocodeService.GeocodeCompleted += new EventHandler<GeocodeService.GeocodeCompletedEventArgs>(geocodeService_GeocodeCompleted);}public void FindAddress(string addressText){// Set the credentialsGeocodeService.GeocodeRequest geocodeRequest = new GeocodeService.GeocodeRequest();geocodeRequest.Credentials = new Credentials();geocodeRequest.Credentials.ApplicationId = _applicationId;// Set the geocode query, which could be an address or location.geocodeRequest.Query = addressText;//Only accept results with high confidencegeocodeRequest.Options = new GeocodeService.GeocodeOptions();GeocodeService.ConfidenceFilter filter = new GeocodeService.ConfidenceFilter();filter.MinimumConfidence = GeocodeService.Confidence.High;geocodeRequest.Options.Filters = new ObservableCollection<GeocodeService.FilterBase>();geocodeRequest.Options.Filters.Add(filter);// Now make the asynchronous Geocode request_geocodeService.GeocodeAsync(geocodeRequest);}void geocodeService_GeocodeCompleted(object sender, GeocodeService.GeocodeCompletedEventArgs e){// Check if geocode was successfulif (e.Result.Results.Count == 0){MessageBox.Show("Could not find address");return;}GeocodeService.GeocodeLocation geocodeLocation = e.Result.Results[0].Locations[0];if (geocodeLocation != null){LocationFound(new GeoCoordinate(geocodeLocation.Latitude, geocodeLocation.Longitude));}}}In the constructor of the class we are passing the Bing maps key which is required by the service.
Secondly we instantiate the service and wire up the GeocodeCompleted event
_geocodeService = new GeocodeService.GeocodeServiceClient("BasicHttpBinding_IGeocodeService"); _geocodeService.GeocodeCompleted += new EventHandler<GeocodeService.GeocodeCompletedEventArgs>(geocodeService_GeocodeCompleted);In the FindAddress function we are using a GeocodeRequest variable which has all the settings concerning the geocoding search and finally we are making the asynchronous Geocode request with the GeocodeAsync; When the geocoding is completed if we have a result we raise the LocationFound event.
Now we need to make some modifications to our MainPage. We will add a textbox for typing in the address we want to find and a button to start the search. The xaml code should look like this:
<!--ContentPanel - place additional content here--><Grid x:Name="ContentPanel" Grid.Row="1" Margin="0,0,0,0"><Grid.RowDefinitions><RowDefinition Height="*"/><RowDefinition Height="Auto"/></Grid.RowDefinitions><my:Map Grid.Row="0" x:Name="MyMap" Margin="0,0,0,0" ZoomLevel="18"ZoomBarVisibility="Visible" Center=" 40.63119,22.94551"CredentialsProvider="your key goes here" /><TextBlock Grid.Row="0" x:Name="txbGPSStatus" VerticalAlignment="Top" HorizontalAlignment="Left" Foreground="Black" FontWeight="Bold" Text="Receiver status" /><StackPanel Grid.Row="1"><StackPanel Orientation="Horizontal"><TextBox x:Name="txtAddress" Text="" Width="382" /><Button x:Name="btnLocate" Content="Find"Click="btnLocate_Click"/></StackPanel></StackPanel></Grid>We need also to add some code in order to use the GeoCoordinateHelper class
private void InitGeocode(){if (geocode == null){geocode = new GeoCoordinateHelper(((ApplicationIdCredentialsProvider)MyMap.CredentialsProvider).ApplicationId);geocode.LocationFound += new GeoCoordinateHelper.LocationFoundEventHandler(geocode_LocationFound);}}void geocode_LocationFound(GeoCoordinate e){Pushpin ps = new Pushpin();posLayer.Children.Add(ps);ps.Content = txtAddress.Text ;ps.Location = e;ps.Visibility = Visibility.Visible;MyMap.Center = e;}If we have a valid result the text we typed will be the content of the pushpin on the map and will center to that point.
Finally we need to implement the Click event of the Find button
private void btnLocate_Click(object sender, RoutedEventArgs e){InitGeocode();geocode.FindAddress(txtAddress.Text);}We can now run our application.
Reverse geocoding
For the reverse geocoding we are going to add a button. When then button is clicked then we are going to send the coordinates of the current position in order to get back the exact address. In the xaml add the following code after the StackPanel with the controls of the geocoding process
<StackPanel Orientation="Horizontal" ><Button x:Name="btnMyAddress" Content="Where am I?"Click="btnMyAddress_Click" Width="240" /></StackPanel>Now let’s go back to our routing helper class, we need to implement the code for the reverse geocoding.
Add the following code to the end of the initialization of the service
_geocodeService.ReverseGeocodeCompleted +=new EventHandler<GeocodeService.ReverseGeocodeCompletedEventArgs>(geocodeService_ReverseGeocodeCompleted);We need also to add a new event , so add the following code after the LocationFound event
public delegate void AddressFoundEventHandler (Address e);public event AddressFoundEventHandler AddressFound;And finally we have to implement the rest of the code for the reverse geocoding.
public void Reverse_Geocode(GeoCoordinate location){// Set the credentials.GeocodeService.ReverseGeocodeRequest ReverseGeocodingRequest = new GeocodeService.ReverseGeocodeRequest();ReverseGeocodingRequest.Credentials = new Credentials();ReverseGeocodingRequest.Credentials.ApplicationId = _applicationId;// Set the location for the reverse geocodingReverseGeocodingRequest.Location = location;//Execute Reverse Geocoding_geocodeService.ReverseGeocodeAsync(ReverseGeocodingRequest);}void geocodeService_ReverseGeocodeCompleted(object sender, GeocodeService.ReverseGeocodeCompletedEventArgs e){if (e.Result.Results.Count > 0){AddressFound(e.Result.Results[0].Address);}}Back to the code of the of main page we need to add the necessary code to utilize reverse geocoding. At InitGeocode we register the AddressFound event
geocode.AddressFound +=new GeoCoordinateHelper.AddressFoundEventHandler(geocode_AddressFound);And finally we add the following code for the Where Am I ? button and geocode_AddressFound
void geocode_AddressFound(GeocodeService.Address e){demoPushin.Content = e.FormattedAddress;MyMap.Center = demoPushin.Location;}private void btnMyAddress_Click(object sender, RoutedEventArgs e){InitGeocode();geocode.Reverse_Geocode(demoPushin.Location);}That’s it. Now we can run our application and test reverse geocoding.
Pivot page and data on Windows Phone 7
Posted by eliasmarkelis in Windows Phone 7 on March 12, 2011
A pivot page provides an efficient way to manage views of data. It can be used for showing groups of data. It is one of the controls compliant with the METRO design language. The pivot control is consisted of Pivot Items which act as single pages. A good rule is not to use more than 4 pivot items per page.
Starting from the application we have build in the previous post (Windows Phone 7 with WCF,getting data from SQL Server) we are going to transform our application to use the pivot page and display our data according to that design model.
Getting started
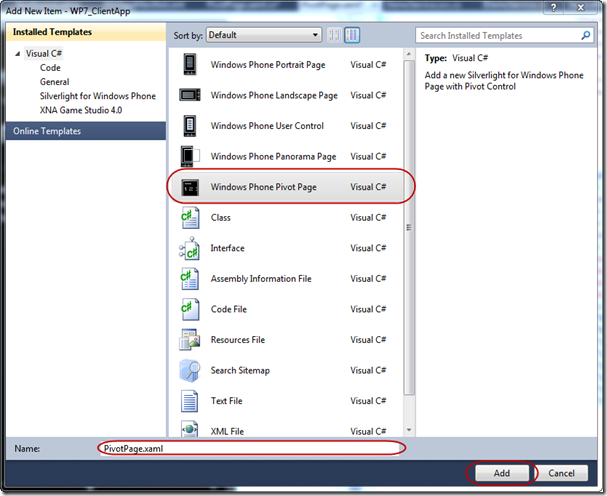
The first thing we need to do is to add a new page to our project (a pivot page).
The pivot control has pivot items. Each pivot item acts as a single page but we can navigate circularly from one item to the other either by dragging our finger to the left or to the right. At the first pivot item we will show the categories, so the user will be able to choose one category and respectively we will load the chosen category products at the second pivot item.
So the first pivot Item will be this:
<!--Pivot item one--><controls:PivotItem Header="Categories"><Grid><ListBox x:Name="lstCategories" SelectionChanged="lstCategories_SelectionChanged"><ListBox.ItemTemplate><DataTemplate><Grid><Grid.RowDefinitions><RowDefinition Height="Auto"/><RowDefinition Height="Auto"/></Grid.RowDefinitions><TextBlock Grid.Column="1" Grid.Row="0" Text="{Binding CategoryName}"FontSize="28" FontWeight="Bold" /><TextBlock Grid.Column="1" Grid.Row="1" Text="{Binding Description}"TextWrapping="Wrap" /></Grid></DataTemplate></ListBox.ItemTemplate></ListBox></Grid></controls:PivotItem>The binding of the two TextBlocks is set to CategoryName and Description so we need to provide a datasource for our listbox. We can do that in the completed event of GetCategories (at my prior post we are building the WCF Service that will get the data from a SQL Server so if you have download the solution of the previous post you are ready to follow). Also at the firs line of the Listbox declaration we have the SelectionChanged event to lstCategories_SelectionChanged so every time a selection is changed we will change the list of products accordingly.
We have to add a new client object in the page scope:
DemoServiceClient srv;
At page construction we should instantiate the client and add handlers for the completed events just bellow the InitializeComponent.
public PivotPage(){InitializeComponent();srv = new DemoServiceClient();srv.GetProductListCompleted +=new EventHandler<GetProductListCompletedEventArgs>(srv_GetProductListCompleted);srv.GetCaregoriesCompleted +=new EventHandler<GetCaregoriesCompletedEventArgs>(srv_GetCaregoriesCompleted);srv.GetCaregoriesAsync();}At the last line we are calling the srv.GetCategoriesAsync to get the products categories, now let’s go to GetCategoriesCompleted event and add the following code in order to set the items source to categories:
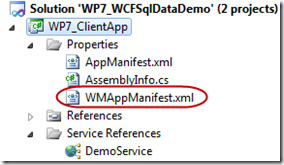
void srv_GetCaregoriesCompleted(object sender, GetCaregoriesCompletedEventArgs e){if (e.Result != null){lstCategories.ItemsSource = e.Result;}}The final touch: before we try our application we will have to set as start page for our application the PivotPage.xaml. Now open the WMAppManifest.xml
and change the following from
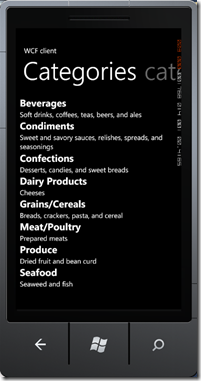
<Tasks> <DefaultTask Name ="_default" NavigationPage="MainPage.xaml"/> </Tasks>to<Tasks> <DefaultTask Name ="_default" NavigationPage="PivotPage.xaml"/> </Tasks>Now let’s test our application. It should look like this:
Product Pivot Item (Step 2)
Now it’s time to fix the second pivot item which will hold our products by category.
<!--Pivot item two--><controls:PivotItem x:Name="piProducts" Header="category"><Grid><ListBox x:Name="lstProducts" SelectionChanged="lstProducts_SelectionChanged"><ListBox.ItemTemplate><DataTemplate><Grid><Grid.RowDefinitions><RowDefinition Height="Auto" /><RowDefinition Height="Auto" /></Grid.RowDefinitions><TextBlock Grid.Row="0" Text="{Binding ProductName}" FontSize="20" FontWeight="Bold" /><StackPanel Grid.Row="1" Orientation="Horizontal"><TextBlock Text="Available stock: "/><TextBlock Text="{Binding UnitsInStock}"/></StackPanel></Grid></DataTemplate></ListBox.ItemTemplate></ListBox></Grid></controls:PivotItem>We can now implement then following code in lstCategories_SelectionChanged event in order to fill the product list with products of the selected category.
private void lstCategories_SelectionChanged(object sender, SelectionChangedEventArgs e){if (lstCategories.SelectedItem != null){Category cat = lstCategories.SelectedItem as Category;piProducts.Header = cat.CategoryName;srv.GetProductListAsync(cat.CategoryID);}}We are also going to set the header of the pivot item to our category name so the user will be informed which products are presented. Also add the following code at the completed event of the GetProductListAsync
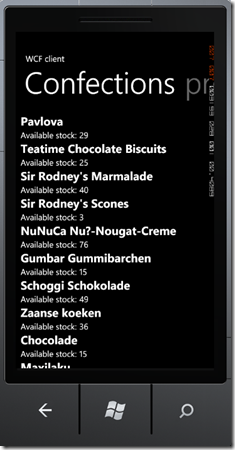
void srv_GetProductListCompleted(object sender, GetProductListCompletedEventArgs e){if (e.Error == null){lstProducts.ItemsSource = e.Result;pivot.SelectedIndex = 1;}}With the pivot.SelectedIndex = 1 we will navigate the user to the products list as soon as it is filled with data. Let’s try our application after we choose a category, we will be navigated to the following pivot Item and it should look like this:
Final step the product detail pivot Item
It is time to fix our last pivot Item with the product details.
<!--Pivot item three--><controls:PivotItem x:Name="piProduct" Header="product"><Grid x:Name="gdProduct"><Grid.ColumnDefinitions><ColumnDefinition Width="170"/><ColumnDefinition Width="Auto"/></Grid.ColumnDefinitions><Grid.RowDefinitions><RowDefinition Height="Auto"/><RowDefinition Height="Auto"/><RowDefinition Height="Auto"/><RowDefinition Height="Auto"/></Grid.RowDefinitions><TextBlock Grid.Row="0" Grid.Column="0"Text="Unit Price :" HorizontalAlignment="Right"/><TextBlock Grid.Row="0" Grid.Column="1"Text="{Binding UnitPrice}" HorizontalAlignment="Left"/><TextBlock Grid.Row="1" Grid.Column="0"Text="Quantity Per Unit :" HorizontalAlignment="Right"/><TextBlock Grid.Row="1" Grid.Column="1"Text="{Binding QuantityPerUnit}" HorizontalAlignment="Left"/><TextBlock Grid.Row="2" Grid.Column="0"Text="Units In Stock :" HorizontalAlignment="Right"/><TextBlock Grid.Row="2" Grid.Column="1"Text="{Binding UnitsInStock}" HorizontalAlignment="Left"/><TextBlock Grid.Row="3" Grid.Column="0"Text="Discontinued :" HorizontalAlignment="Right"/><TextBlock Grid.Row="3" Grid.Column="1"Text="{Binding Discontinued}" HorizontalAlignment="Left"/></Grid></controls:PivotItem>Now we have to implement the SelectionChanged event of the products list listbox
private void lstProducts_SelectionChanged(object sender, SelectionChangedEventArgs e){if (lstProducts.SelectedItem != null){Product pr = lstProducts.SelectedItem as Product;piProduct.Header = pr.ProductName;gdProduct.DataContext = pr;pivot.SelectedIndex = 2;}}Because we have already loaded the products in our product list there is not need to call again the service to retrieve the product , so we can just pass the selected product as a datasource for our details page and we are finished.
Windows Phone 7 with WCF, getting data from SQL Server
Posted by eliasmarkelis in Visual Studio 2010, Windows Phone 7 on March 5, 2011
In my previous post (Windows Phone 7 with WCF) we have developed a simple WP7 application which gets a list of products from a WCF service. We are going to upgrade this application so that we can get data from a SQL Server.
As a database we are going to use the old and nice Northwind which can be found here.
Our main purpose will be to get the product categories so that we will be able to query the database each time to get a different category product list and finally the selected product details.
Getting started
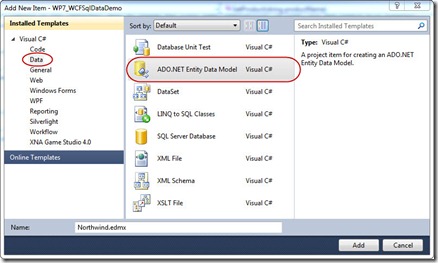
Starting from the previous application (download) we will add a new entity data model,
name the new model Northwind,
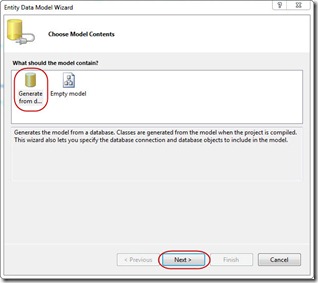
next select generate from database and click next.
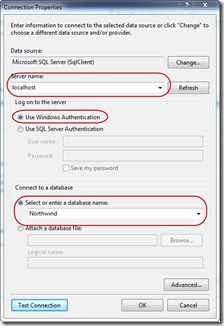
Select the appropriate SQL Server and select the Northwind database, also select “Use windows Authentication” .
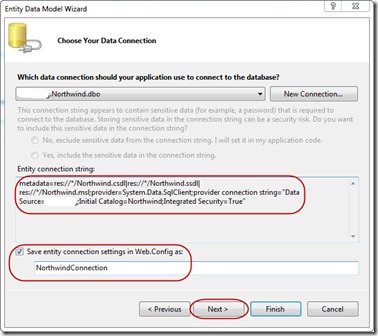
At the next window be sure that the option to save the connection string in Web.config is checked and click next.
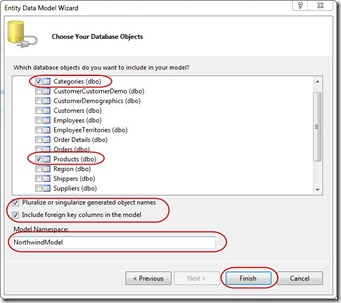
It’s time to select our tables and to give a name for the Model namespace.
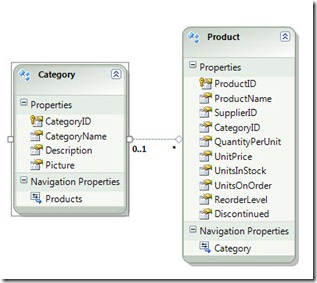
Finally your edmx should look like this:
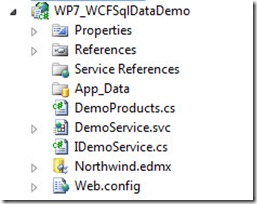
And your project like this:
Delete the demo product class (we are going to use the entity model to fetch data).
Now go to IDemoService and change the code.
[ServiceContract]public interface IDemoService{[OperationContract]Dictionary<int, string> GetProductList(int categoryId);[OperationContract]Product GetProduct(int productId);[OperationContract]List<Category> GetCaregories();}Now that we have changed the Operation contracts let’s implement them. Open the DemoService.svc code file and add the following code:
[AspNetCompatibilityRequirements(RequirementsMode = AspNetCompatibilityRequirementsMode.Required)]public class DemoService : IDemoService{public Dictionary<int, string> GetProductList(int categoryId){NorthwindConnection _context = new NorthwindConnection();var q = _context.Products.Where(p=>p.CategoryID==categoryId).Select(p => new { p.ProductID, p.ProductName }) ;Dictionary<int, string> prs = new Dictionary<int, string>();foreach (var obj in q){prs.Add(obj.ProductID, obj.ProductName);}return prs;}public Product GetProduct(int productId){NorthwindConnection _context = new NorthwindConnection();return _context.Products.Where(p => p.ProductID == productId).FirstOrDefault<Product>();}public List<Category> GetCaregories(){NorthwindConnection _context = new NorthwindConnection();return _context.Categories.ToList();}}Now build the service to ensure that there are no errors and update the DemoService service reference in the client application.
Now its time to make all the necessary changes in our client application. In the previous post we used the combobox as picker for the products which is not compatible with Windows Phone 7 Metro style. At this stage we are going to use the list picker from the toolkit which is Metro themed and more suitable for the Windows Phone UI..
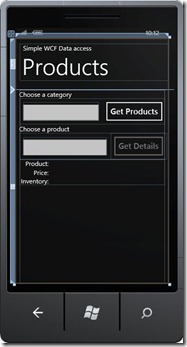
So the form in the end will look like this:
<phone:PhoneApplicationPage xmlns:toolkit="clr-namespace:Microsoft.Phone.Controls;assembly=Microsoft.Phone.Controls.Toolkit"x:Class="WP7_ClientApp.MainPage"xmlns="http://schemas.microsoft.com/winfx/2006/xaml/presentation"xmlns:x="http://schemas.microsoft.com/winfx/2006/xaml"xmlns:phone="clr-namespace:Microsoft.Phone.Controls;assembly=Microsoft.Phone"xmlns:shell="clr-namespace:Microsoft.Phone.Shell;assembly=Microsoft.Phone"xmlns:d="http://schemas.microsoft.com/expression/blend/2008"xmlns:mc="http://schemas.openxmlformats.org/markup-compatibility/2006"mc:Ignorable="d" d:DesignWidth="480" d:DesignHeight="768"FontFamily="{StaticResource PhoneFontFamilyNormal}"FontSize="{StaticResource PhoneFontSizeNormal}"Foreground="{StaticResource PhoneForegroundBrush}"SupportedOrientations="Portrait" Orientation="Portrait"shell:SystemTray.IsVisible="True"><phone:PhoneApplicationPage.Resources><DataTemplate x:Key="DataTemplate1"><Grid><TextBlock Text="{Binding CategoryName}" Margin="0,10,0,10"/></Grid></DataTemplate></phone:PhoneApplicationPage.Resources><!--LayoutRoot is the root grid where all page content is placed--><Grid x:Name="LayoutRoot" Background="Transparent"><Grid.RowDefinitions><RowDefinition Height="Auto"/><RowDefinition Height="*"/></Grid.RowDefinitions><!--TitlePanel contains the name of the application and page title--><StackPanel x:Name="TitlePanel" Grid.Row="0" Margin="12,17,0,28"><TextBlock x:Name="ApplicationTitle" Text="Simple WCF Data access" Style="{StaticResource PhoneTextNormalStyle}"/><TextBlock x:Name="PageTitle" Text="Products" Margin="9,-7,0,0" Style="{StaticResource PhoneTextTitle1Style}"/></StackPanel><!--ContentPanel - place additional content here--><Grid x:Name="ContentPanel" Grid.Row="1" Margin="12,0,12,0"><Grid.RowDefinitions><RowDefinition Height="Auto" /><RowDefinition Height="Auto" /></Grid.RowDefinitions><StackPanel Grid.Row="0"><TextBlock Text="Choose a category" /><StackPanel Orientation="Horizontal"><toolkit:ListPicker x:Name="lspCategories" Width="237" ItemTemplate="{StaticResource DataTemplate1}" /><Button x:Name="btnGetCategory" Content="Get Products" Click="btnGetCategory_Click" /></StackPanel><TextBlock Text="Choose a product" /><StackPanel Orientation="Horizontal"><toolkit:ListPicker x:Name="lspProducts" Width="262" IsEnabled="False" /><Button x:Name="btnGetProduct" Content="Get Details" IsEnabled="False" Click="btnGetProduct_Click" /></StackPanel></StackPanel><Grid x:Name="dgProduct" Grid.Row="1" ><Grid.RowDefinitions><RowDefinition Height="Auto" /><RowDefinition Height="Auto" /><RowDefinition Height="Auto" /></Grid.RowDefinitions><Grid.ColumnDefinitions><ColumnDefinition Width="Auto" /><ColumnDefinition Width="Auto" /></Grid.ColumnDefinitions><TextBlock Grid.Row="0" Grid.Column="0" Text="Product:" Margin="5,0,5,0" VerticalAlignment="Center" HorizontalAlignment="Right"/><TextBlock x:Name="txbDescription" Grid.Row="0" Grid.Column="1" Text="{Binding ProductName}" Margin="5,0,5,0" VerticalAlignment="Center" HorizontalAlignment="Left"/><TextBlock Grid.Row="1" Grid.Column="0" Text="Price:" Margin="5,0,5,0" VerticalAlignment="Center" HorizontalAlignment="Right"/><TextBlock x:Name="txbPrice" Grid.Row="1" Grid.Column="1" Text="{Binding UnitPrice}" Margin="5,0,5,0" VerticalAlignment="Center" HorizontalAlignment="Left"/><TextBlock Grid.Row="2" Grid.Column="0" Text="Inventory:" Margin="5,0,5,0" VerticalAlignment="Center" HorizontalAlignment="Right"/><TextBlock x:Name="txbStock" Grid.Row="2" Grid.Column="1" Text="{Binding UnitsInStock}" Margin="5,0,5,0" VerticalAlignment="Center" HorizontalAlignment="Left"/></Grid></Grid></Grid></phone:PhoneApplicationPage>Now it’s time to implement our code in the code behind file.
At page construction we should instantiate the client and add handlers for the completed events just bellow the InitializeComponent.
srv = new DemoServiceClient();srv.GetProductCompleted += new EventHandler<GetProductCompletedEventArgs>(srv_GetProductCompleted);srv.GetProductListCompleted += new EventHandler<GetProductListCompletedEventArgs>(srv_GetProductListCompleted);srv.GetCaregoriesCompleted += new EventHandler<GetCaregoriesCompletedEventArgs>(srv_GetCaregoriesCompleted);srv.GetCaregoriesAsync();In the last line we are calling the GetCategoriesAsync so that categories will be available for the user when the app is up and running,so in the GetCaregoriesCompleted event handler (srv_GetCaregoriesCompleted) add the following code:
if (e.Result != null)lspCategories.ItemsSource = e.Result;In the click event of the Get Products button add the following code.
int id = ((Category)lspCategories.SelectedItem).CategoryID;srv.GetProductListAsync(id);lspProducts.IsEnabled = true;btnGetProduct.IsEnabled = true;In the GetCaregoriesCompleted event handler (srv_GetProductListCompleted) add the following code to get the data for the listpicker which will hold the products:
if(e.Result!=null)lspProducts.ItemsSource = e.Result;At the Get Details button click event add the following code:
KeyValuePair<int, string> si =(KeyValuePair<int, string>)lspProducts.SelectedItem;srv.GetProductAsync(si.Key);And finally in the GetProductCompleted event handler (srv_GetProductCompleted) add the following code:
if (e.Result!=null)dgProduct.DataContext = e.Result;And we are ready to go.
In the next post we will change the interface in something more suitable as an interface like the PivotPage.
Windows Phone 7 with WCF
Posted by eliasmarkelis in Windows Phone 7 on February 27, 2011
In this article we will see how we can use WCF on Windows Phone 7 step by step.
We are going to build a simple WCF service which will provide us with some sample data and a Windows Phone 7 application which will consume the service.
Getting Started
WCF on the Windows Phone 7 is Asynchronous only, which means that every request needs to capture the response by capturing the Completed event when it eventually gets back. In simple words that means that we don’t know when the response will come back so we have to capture the response at the completed event to use it.
Our service will provide us access to a list of products plus their prices and stock.
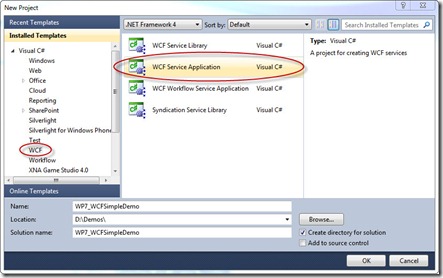
Let’s start by creating a WCF Service Application
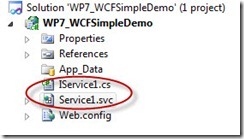 |
Delete IService1.cs and Service1.scv, we are going to add a new one with a more meaningful name. |
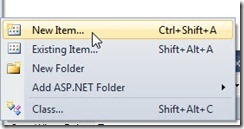
Now we are going to add a new service.
| Let’s name the new service DemoService | 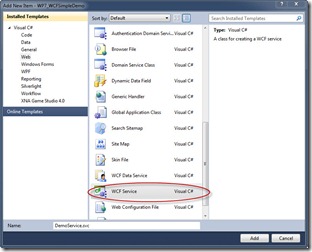 |
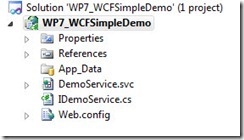
Your solution should look like this:
Now go to the IDemoService.cs
We will add a Data Contract for the product so that our Windows Phone 7 application is aware of the type Product
[DataContract]public class Product{[DataMember]public string Description { get; set; }[DataMember]public double Price { get; set; }[DataMember]public int Stock { get; set; }}It’s time to declare our Operation contacts, we are going to have two the GetProductList and the GetProduct
[ServiceContract]public interface IDemoService{[OperationContract]List<string> GetProductList();[OperationContract]Product GetProduct(string productName);}We should add an new class to our service the would act as our data source and we are going to name it DemoProducts.cs
public class DemoProducts: List<Product>{public DemoProducts(){LoadData();}public List<string> GetList(){var ls = this.Select(p => new { p.Description });return ls as List<string>;}public Product GetProduct(string description){return this.Where(p => p.Description == description).First();}private void LoadData(){Product pr;pr = new Product();pr.Description = "Pencil";pr.Stock = 100;pr.Price = 0.10;this.Add( pr);pr = new Product();pr.Description = "Pen";pr.Stock = 50;pr.Price = 12;this.Add(pr);pr = new Product();pr.Description = "Notebook";pr.Stock = 48;pr.Price = 2.7;this.Add(pr);}}Now let’s implement our contracts. Open the DemoSercise.svc code file and add the following code:
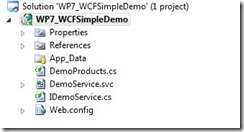
public class DemoService : IDemoService{public List<string> GetProductList(){DemoProducts dProd = new DemoProducts();return dProd.GetList();}public Product GetProduct(string productName){DemoProducts dProd = new DemoProducts();return dProd.GetProduct(productName);}}At this point your solution should look similar to this
And we are ready to start building our Windows Phone 7 application.
Building the Windows Phone Application
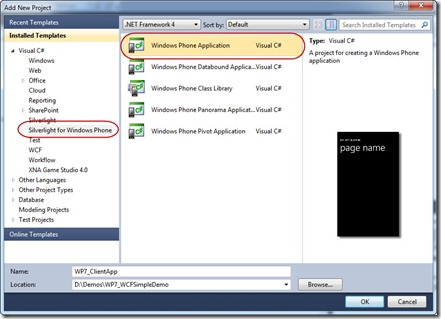
We are going to add a new Windows Phone Application
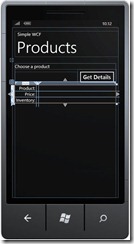
Go to MainPage. The UI would be like that:
<Grid x:Name="ContentPanel" Grid.Row="1" Margin="12,0,12,0"><Grid.RowDefinitions><RowDefinition Height="Auto" /><RowDefinition Height="Auto" /></Grid.RowDefinitions><StackPanel Grid.Row="0"><TextBlock Text="Choose a product" /><StackPanel Orientation="Horizontal"><ComboBox x:Name="cmbProducts" Width="283" Height="49"/><Button x:Name="btnGetProduct" Content="Get Details" /></StackPanel></StackPanel><Grid x:Name="dgProduct" Grid.Row="1" ><Grid.RowDefinitions><RowDefinition Height="Auto" /><RowDefinition Height="Auto" /><RowDefinition Height="Auto" /></Grid.RowDefinitions><Grid.ColumnDefinitions><ColumnDefinition Width="Auto" /><ColumnDefinition Width="Auto" /></Grid.ColumnDefinitions><TextBlock Grid.Row="0" Grid.Column="0" Text="Product:" Margin="5,0,5,0" VerticalAlignment="Center" HorizontalAlignment="Right"/><TextBlock x:Name="txbDescription" Grid.Row="0" Grid.Column="1" Text="{Binding Description}" Margin="5,0,5,0" VerticalAlignment="Center" HorizontalAlignment="Left"/><TextBlock Grid.Row="1" Grid.Column="0" Text="Price:" Margin="5,0,5,0" VerticalAlignment="Center" HorizontalAlignment="Right"/><TextBlock x:Name="txbPrice" Grid.Row="0" Grid.Column="1" Text="{Binding Price}" Margin="5,0,5,0" VerticalAlignment="Center" HorizontalAlignment="Left"/><TextBlock Grid.Row="2" Grid.Column="0" Text="Inventory:" Margin="5,0,5,0" VerticalAlignment="Center" HorizontalAlignment="Right"/><TextBlock x:Name="txbStock" Grid.Row="0" Grid.Column="1" Text="{Binding Stock}" Margin="5,0,5,0" VerticalAlignment="Center" HorizontalAlignment="Left"/></Grid></Grid></Grid>Ok, now for the fun part we should add a reference for our service.
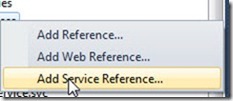
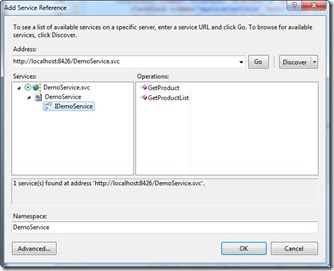
Search for services in Solution from the Discover button.
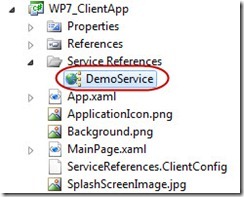
Select DemoService and in the namespace type DemoService.
Now back to the code behind file of our page, add a using statement:
using WP7_ClientApp.DemoService;and a new client object in the page scope:
DemoServiceClient srv;At page construction we should instantiate the client and add handlers for the completed events just bellow the InitializeComponent.
public MainPage(){InitializeComponent();srv = new DemoServiceClient();srv.GetProductCompleted += new EventHandler<GetProductCompletedEventArgs>(srv_GetProductCompleted);srv.GetProductListCompleted += new EventHandler<GetProductListCompletedEventArgs>(srv_GetProductListCompleted);}Call the get list to fill the combobox
srv.GetProductListAsync();When the service answers back the answer will be at the event srv_GetProductListCompleted so we write the following code:
void srv_GetProductListCompleted(object sender, GetProductListCompletedEventArgs e){if (e.Result != null){foreach (string str in e.Result){cmbProducts.Items.Add(str);}cmbProducts.SelectedIndex = 0;}}We should check if the response is null (which means we have to let the user know that we haven’t got a result) and similarly we have to write the following code at srv_GetProductCompleted:
void srv_GetProductCompleted(object sender, GetProductCompletedEventArgs e){if (e.Result!=null)dgProduct.DataContext = e.Result;}Now we have to add the following line to call our service with the desired product at the click event of the Get Details button.
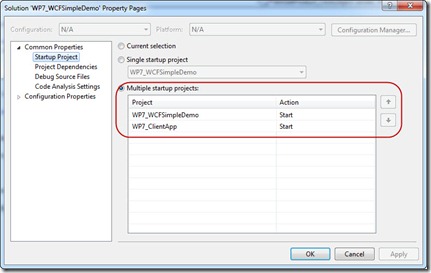
srv.GetProductAsync(cmbProducts.SelectedItem.ToString());Finally we have to set the startup order of our projects in our solution.
And voila, we are ready to rock.
